

SuperWidgets is intended to be a tool to assist in the creation of a Cabbage gui. There are several goals set for this.
- Elimination of printf statement, or just a serious reduction.
- The opcodes provided should mimic the identifiers used by Cabbage, for the ease of learning.
- Dealing with widget bounding boxes should be made as transparent as possible.
- While you can use this tool to develop a gui, sometime prior to release, SuperWidgets can be used to create a text file that can be used in the flattened version of a project. At this point, your gui will be static, but it won’t include the memory hog that is SuperWidgets.
As I’ve always held a working relationship with the printf function, how it gets used to generate strings is difficult at best to deal with, and a nightmare as they grow. So, effectively the underlying library named “creator.csdx” is a replacement for the printf headache. For each of the identifiers used within Cabbage, there is a corresponding opcode with a prefix of ‘x_’. So, for something such as ‘bounds()’, the opcode for creator would look like:
opcode x_bounds, S, iiii
    iX, iY, iW, iH xin
    xout sprintf("bounds(%d, %d, %d, %d)", iX, iY, iW, iH)
endop
Some of the identifiers, because of the format of the code used by Cabbage, and my lack of knowledge in how to recreate it, I have written extra opcodes named with a ‘2’ at the end of their names. These are mostly the colour setting identifiers, such as:
colour:1("Red")
would become
x_colour2, S, iS
    iOpt, SColour xin
    xout sprintf("colour:%d(%s)", iOpt, x_quote(SColour))
endop
Also, because Bounding Boxes are used extensively within SuperWidgets, there is a version of the ‘x_bounds’ that takes an array of 4 elements.
Another design idea for the ‘creator’ library is to delay the creation of the string used by Cabbage to create the widgets, we can keep all of the data for the widgets in an actual variable of that data type, allowing the data to be manipulated and calculated, and then only when needed made into a string.
The strings for each identifier are kept separately in an array, and in keeping them in arrays, we can create different sets of these identifiers to use as how the widgets get dressed up or how their functionality is defined. There are groups of identifiers that fit together into different sets. Minimal functionality:
bounds
text
channel
parent
These are just a few, and some identifiers might even cross the boundaries from one set to another. I have labeled these basic sets as:
- Minimal functionality
- Decorative functionality
- Local functionaltiy
Minimal functionality refers to any data required for the widget to operate. Decorative functionality are the things that give the gui its unique look. How all of the knobs share the same look and feel, all the sliders share an appearance, the buttons are all visually comparable. And Local functionality is something that not shared by other widgets of the same types. This is mostly things like “range” for sliders, but it would also make it easy to share the same data options for related popup menus or option buttons.
Almost everything dealt with in this tutorial/demonstration is using the Minimal functionality set of identifiers, but obviously we will have to deal with things like “range” or “items”, from the Local functionality set.
Onto the demonstration. SW_Tutorial_01.zip (7.5 KB)
Download and load up the “01_Tutorial.csd” file. Because this is a programming tool, I figured a hands-on experience will show this better. You’ll only need to make one simple edit between the different runs of the tutorial, but it really is simple.
On the first run of the program you should see:
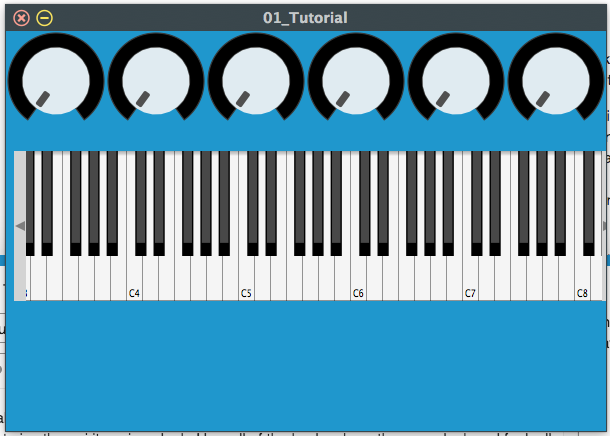
The instrument this is designed for is an extended version of the instrument that Cabbage creates in it’s default file. It allows for an ADSR envelop, and basic wave selection, and pulse width modulation. As this design doesn’t assign data ranges for the sliders, they are not of much use for things like selecting the wave, but be patient, that comes later. But the ADSR stuff should work, but only manually.
In looking at the code, there are a few concepts to point out.
instr simplebuilder
    iW cabbageGet "form", "width"
    iH cabbageGet "form", "height"

    x_flattenCode 1

    iBBox[] = fillarray(0, 0, iW, 100)

    iSliderSize = 50
    SParams[] = fillarray("attack", "decay", "sustain", "release", "wave", "pulsewidth")

    iSliderCount = lenarray(SParams)
    iSliderBoxes[][] sw_splitInto iBBox, iSliderCount
    printarray iSliderBoxes

    iCount = 0
    while iCount < iSliderCount do
        x_create "rslider", fillarray(x_bounds(getrow(iSliderBoxes, iCount)), x_channel(sprintf("simple%s", SParams[iCount])))

        iCount = iCount + 1
    od
endin
The first thing you’ll notice is the size of the form is read from the form widget. We are going to be basing the widgets we are creating upon this size. The ‘x_flattenCode’ is the option used to print out the strings sent to Cabbage to create the widgets.
In the Csound console, you should see some text printed out:
   0: 0.0000 0.0000 100.0000 100.0000
   1: 100.0000 0.0000 100.0000 100.0000
   2: 200.0000 0.0000 100.0000 100.0000
   3: 300.0000 0.0000 100.0000 100.0000
   4: 400.0000 0.0000 100.0000 100.0000
   5: 500.0000 0.0000 100.0000 100.0000
rslider bounds(0, 0, 100, 100) channel("simpleattack")
rslider bounds(100, 0, 100, 100) channel("simpledecay")
rslider bounds(200, 0, 100, 100) channel("simplesustain")
rslider bounds(300, 0, 100, 100) channel("simplerelease")
rslider bounds(400, 0, 100, 100) channel("simplewave")
rslider bounds(500, 0, 100, 100) channel("simplepulsewidth")
The first chunks are the bounding boxes we calculated based on ‘iBBox’. The opcode used to calculate these boxes is ‘sw_splitInto’, while it can do much more, we are currently using it to create a single row of boxes with iSliderCount number of boxes.
The following loop is used to create each of the ‘rslider’ object needed for the gui.
x_create "rslider", fillarray(x_bounds(getrow(iSliderBoxes, iCount)), x_channel(sprintf("simple%s", SParams[iCount])))
The ‘x_create’ opcode is called with the type of widget to be created, followed by an array of strings for each of the identifiers need to make the widget work. Here we get the bounding box data using ‘getrow’, and it is passed to the ‘x_bounds’ opcode. And in one of the few instances of a printf statement, we create the channel name used by the widget.
Now, edit the tutorial file to use “simplebuilder2”, and run it. You should see something like:
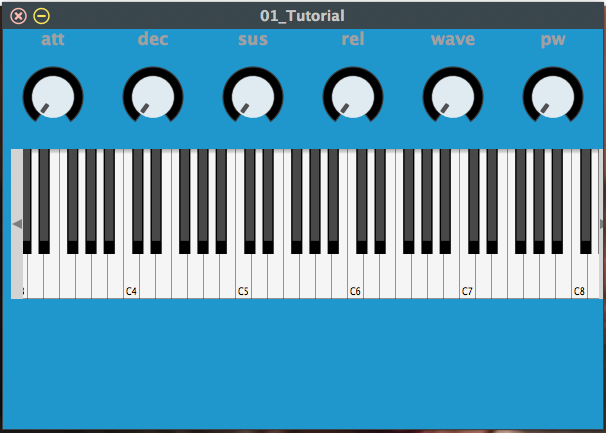
In this version, we added a label and made the knob smaller. But we have also made each of these widgets “locked” to either the top or the bottom of the bounding box we have. This is done using the following code:
x_create "label",   fillarray(x_bounds(sw_alignBounds(iBBox2, iSliderSize, 20, "ct")), x_text(SLabels[iCount]))
x_create "rslider", fillarray(x_bounds(sw_alignBounds(iBBox2, iSliderSize, iSliderSize, "cb")), x_channel(sprintf("simple%s", SParams[iCount])))
The label is locked to the top of the bounding box using ‘sw_alignBounds’, which returns the bounding box for the label. iBBox2 is the original bounding box, iSliderSize is the width for the label, with a height of 20, and “ct” locks it to the “center top” of iBBox2. The same is done for the ‘rslider’, but with “cb” instead, so it is on “center bottom”.
Make another edit to the source to use “simplebuilder3”, and rerun. You should get the following:
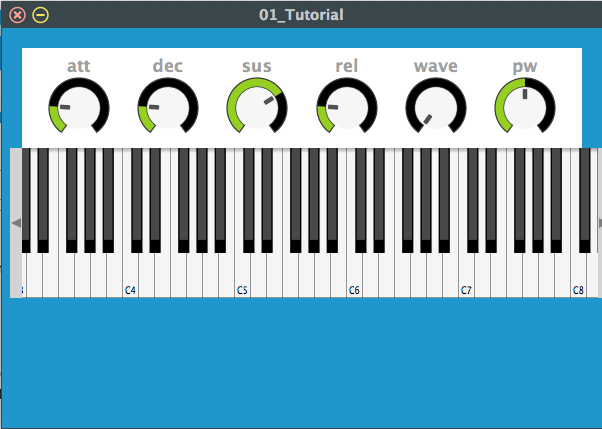
In this example, I’ve split the work into two parts. The first defines the data used by the widgets, the second calls an opcode to do the actual building. There are a number of changes here, and the first is the ability to put the label at the top or the bottom of our gui. The second creates a parent object (in this case an image), to be used as a plant. We will be adding our widgets to that.
We create the plant image with:
x_create "image", fillarray(x_bounds(iBBox), x_channel(SObj))
By default, Cabbage sets the background for an image to white, so if you want no background, you’ll have to use:
x_colour(0, 0, 0, 0)
to make it transparent.
For each of the widgets we want to add to the plant, we must include the following:
x_parent(SParent)
We also have to create a new, local bounding box for the plant. Next we want to shrink the bounding box to get the labels and the knobs away from the edges of the plant. This is done with:
iScaledBox[] = sw_scaleBounds(iLocBox, .85)
We then use that to split into the regions used by our widgets. You’ll also notice that I got around to setting the ranges for the objects.
And if you make the final change (to 4) and run it, you should see this:
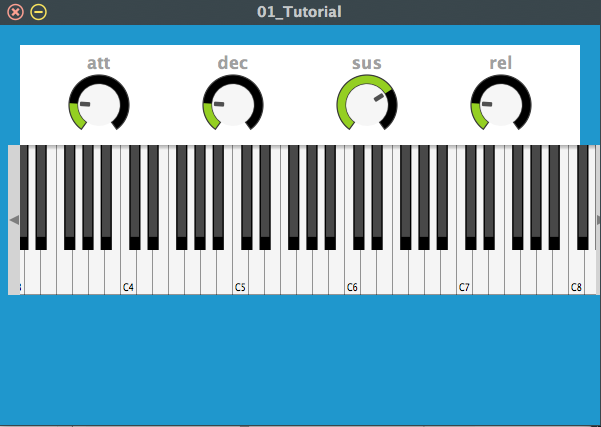
We now have an opcode that we can use to create any number of plants with rows of knobs. As we develop more of these opcodes, we can create any number of plants that are reusable in any number of situations.